City Living? How To Install a Window Flower Box That Lasts
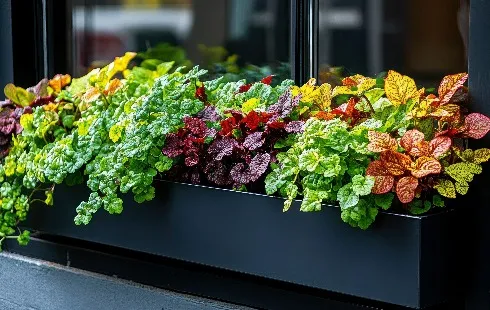 Urban dwellers often crave a connection to nature, and window flower boxes offer a simple way to bring greenery into their living space. These compact gardens transform ordinary cityscapes into vibrant displays of color and life.
The challenge here is getting the installation right so that the beauty lasts. This is especially true in city conditions, where space is tight, and the weather can be unpredictable. While this task isn't complicated, it does take attention to detail and careful planning.
Here's a practical guide to installing a window flower box that stays secure and looks great throughout the seasons.
Choose the Right Window Box Material
Materials matter when picking a box that will stay in good shape through sun, rain, and snow. It's tempting to choose based on appearance alone, but durability plays a much bigger role in the long run.
Here are the most common materials to consider:
Wood
This material has a classic, natural appeal. Cedar and redwood tend to perform better outdoors but still require sealing or painting to prevent moisture damage. For a longer-lasting alternative, composite materials are a great choice. They replicate the look of wood while offering stronger resistance to rot and water exposure.
Metal
Metal boxes are reliable if strength and a more structured style are the goals. Wrought iron window boxes, in particular, stand out for their decorative detail and long-lasting durability. Coated steel and aluminum also offer solid support and resist warping, making them suitable for heavier plant arrangements.
Plastic
This material is a common go-to for window box planters because it's lightweight, budget-friendly, and rust-resistant. One popular type is PVC, which handles moisture well and requires little upkeep. Some versions are designed to mimic other materials and can be surprisingly convincing. Be sure to choose a high-quality product so it won't fade or become brittle under scorching sunlight.
No matter the material, make sure the box includes proper drainage holes and feels sturdy. A well-built base supports healthy plants and saves you the trouble of replacing or repairing the container every season.
Measure the Window Frame Properly
Next, measure the space where the flower box will sit accurately. An ill-fitting one can look awkward or feel unstable.
Start by measuring the windowsill width, accounting for any trim or architectural details that might interfere with installation. The box should extend slightly beyond the window frame for optimal visual balance, typically 2-4 inches on each side.
Depth and height also count. A box that's at least 6 to 8 inches deep gives plant roots enough room to grow. Height should be enough to hold a good amount of soil, ideally around 7 to 9 inches, while still allowing water drainage. Just be careful not to block too much of the window, particularly in smaller apartments where natural light is precious.
Install the Mounting Hardware
Now's the time to start the real work: installing the mounting hardware. You can go with brackets or screw the box directly into place. It depends on the container type and the surface to which you'll mount it.
If you're mounting into brick, concrete, or stone, use a masonry screw or bit along with the appropriate anchors to hold the weight. For wood siding, heavy-duty screws--or better yet, lag bolts--offer extra strength and support. When unsure, it's safer to use metal brackets with multiple anchor points. This spreads out the weight and reduces the risk of damage over time.
Once the hardware is in place, gently tug it to test for movement. If it shifts or wobbles, tighten the screws and check the alignment. If anything still feels loose, add extra support.
Fill the Box With Soil and Plants
After the mounting hardware is securely in place, it's time to prepare your window box planter. Don't attach it yet--it's much easier to fill and plant it while it's on a flat surface.
Start by adding a layer of potting mix. This type of soil is lighter than garden soil and works better for containers because it holds the right amount of moisture and drains well.Now, choose your plants based on how much sunlight your window gets:
-
For sunny windows: Try petunias, geraniums, marigolds, lavender, or herbs like basil and thyme.
-
For shady spots: Opt for impatiens, ferns, begonias, coleus, or trailing ivy.
Arrange the plants with care. Place taller ones at the back, or in the center if the box will be seen from both sides. Add shorter or trailing plants along the front and edges so they can drape gently over the sides. Press the soil around each plant to keep it steady, then water well to help everything settle in.
Once your mini garden is planted and ready, lift the box and securely place it onto the mounting hardware.
Maintenance Tips to Keep It Looking Fresh
Once installed, your window flower box needs regular maintenance. Watering is crucial--urban windows can create microclimates that dry out the soil quickly. Check moisture levels daily during hot weather. Trim dead blooms and yellowing leaves to keep plants healthy and tidy.
Feed your plants with diluted fertilizer every few weeks to encourage strong growth and flowering. If your area has dry weather or is prone to pollution, rinse the leaves occasionally. This helps keep them clean and supports photosynthesis.
Wrapping Up
You may want something new to brighten up your space or bring a little nature into your daily routine. A window flower box does exactly that. It's simple to install, easy to care for, and adds instant charm to your home.
You might hesitate at first, unsure about how to start or whether it will last. But with the proper steps, it's easier than you think. A little effort goes a long way in creating something beautiful that grows right outside your window.